

In this tutorial I will show you how to buy a certificate with crypto such as Bitcoin and Ethereum. You can buy certificates for a duration between 1 year and 5 years, and you can also buy wildcard certificates, code signing certificates, among others. To complete this tutorial, you will need to have a domain as well as access to a machine which has openssl installed on it.
Most likely, if you are running a website, you have already secured it with a free HTTPS certificate using LetsEncrypt. This approach works fine for HTTPS traffic. But there are several types of applications which a LetsEncrypt certificate cannot cover. It cannot issue certificates for code signing or any kind of traffic that is not HTTPS. This means your database or business application that is communicating on a custom port cannot be encrypted with a LetsEncrypt certificate. Also if you want to build a Windows or MacOS app then you must have a code signing certificate to build it, otherwise your users will get obnoxious warnings when they run it.
How to buy TLS certificates with crypto
There is no website as of today that will let you directly purchase certificates with crypto. But there is a loophole inside this process that lets you purchase certificates with prepaid debit cards such as MasterCard or Visa. First I will show you how to purchase these prepaid cards with crypto, then how to use the card to buy a TLS certificate, and finally how to create a Certificate Signing Request (CSR) so that the certificate authority can issue a certificate to you.
One problem I found while writing this guide is that many certificate authorities (CAs) charge outrageous prices for certificates. However, I found a bulk retailer SSL2BUY which resells certificates at heavily discounted prices. In this guide we will be using crypto to buy certificates from this provider. Normally, the certificates cost hundreds of dollars on other websites, but this one offers similar certificates for just $20-$50 dollars.
Step 1: Buy prepaid card with crypto
Because certificates cannot currently be bought with crypto directly, you must buy them using a prepaid card bought with crypto.
Ezzocard is a reputable website which sells prepaid debit cards. These debit cards have a fixed balance which cannot be increased later. Also the prepaid cards have a short expiration date of around 6 months so make sure you use them quickly. They accept payment in Bitcoin, Ethereum, Dogecoin, USDT, Litecoin, Bitcoin Cash, and Perfect Money.

I should also mention that all of the prepaid cards sold on the website are completely legal – they purchase the cards from financial institutions. There are no stolen credit cards available at all, so you don’t need to worry about that. In fact, it is not possible to sell credit cards legally online anyway – only prepaid debit cards.
In this tutorial we will purchase a Black card which will work at most online stores. Personally, I have successfully used Black cards to purchase products from Netflix, Amazon.com, npm, Docker Hub, and various other websites such as the ones using Stripe payment processor. I have not tested whether stores will accept any of the other card colors yet, so purchase them at your own risk.
How to buy prepaid cards from Ezzocard
First, go to ezzocard.com and select any of the Black cards. Add them to your card and go to checkout. Check the URL carefully – beware of scams and phishing domains!
You have about 5 minutes to confirm the exchange rate you want to pay at, and an additional 30 minutes to send the cryptocurrency to Ezzocard.
Warning: After sending the cryptocurrency, do not close your browser tab until you see your card details. Otherwise your card details will be lost forever
After your cryptocurrency transaction has confirmed (more info on how that works here), you should wait an additional 5 minutes for the debit card details to display in the browser.
Once you see your card details, copy all of the details to a text file and save them into a text file. You may now close your browser window. You will not be able to retrieve your card details from the website again. This is why it’s important to save them to a text file.
At this point, now you have your prepaid card, so head to step 2. We will use the card number, expiration date, and CVV2 (some websites call it CVV) to purchase the SSL certificate.
Step 2: Buy TLS certificate with the crypto prepaid card
Now we will head to SSL2Buy and purchase one of the available certificates. You should choose the certificate that best matches your needs. In this tutorial, I will buy an AlphaSSL wildcard certificate because I want to sign traffic coming from all of my subdomains.
Add the certificate to your cart and head to checkout. You will be asked to create an account – create one or just sign in with Google.
Now you will select the “Visa or Mastercard” payment option and use your prepaid card details to complete the purchase. For Billing Details, use the following information I got from Ezzocard support:
- Name: use any name <real name recommended – they won’t contact you>
- Email: use any email
- Country: USA
- State: Massachusetts (MA)
- City: Danvers
- Street: 250 Independence Way
- Apartment/Suite number: Leave blank (this field is optional)
- ZIP code: 09123
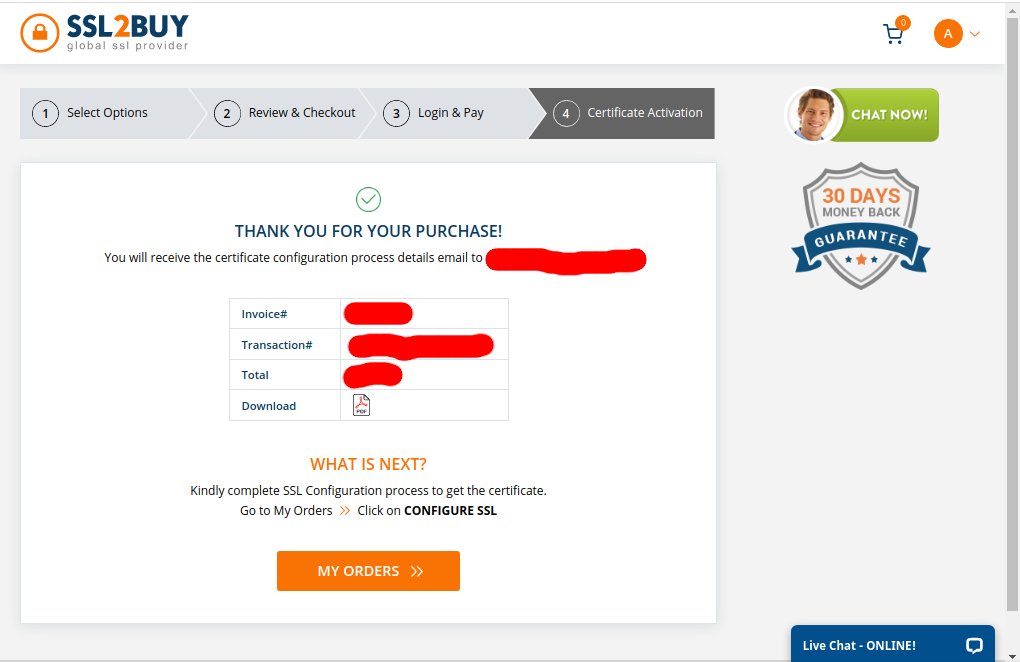
The payment will only take a few seconds to process. When it completes, you should see the success screen below.
Step 3: Create a Certificate Signing Request (CSR) and verify domain
We can perform the last step of buying a certificate with crypto by registering wiht with a Certificate Authority.
On the Order Complete screen, click on My Orders then click Setup Certificate at the right of the screen. under My Certificates. This will take you to a webpage where you will provide details about the certificate in the Certificate Signing Request. The webpage will ask you to complete CAPTCHA – just solve it and go to the next step.
Create a CSR with OpenSSL
The next step will ask you to copy and paste a CSR. Now you must create a CSR using OpenSSL.
Paste the following command (without the “$” sign) into a Terminal or Command Prompt which has OpenSSL installed. You will be prompted for the domain name and your country, state, city, and other information similar to the example below.
$ openssl req -utf8 -nodes -sha256 -newkey rsa:2048 -keyout domain.key -out domain.csr
Generating a RSA private key
..+++++
.....................+++++
writing new private key to 'domain.key'
-----
You are about to be asked to enter information that will be incorporated
into your certificate request.
What you are about to enter is what is called a Distinguished Name or a DN.
There are quite a few fields but you can leave some blank
For some fields there will be a default value,
If you enter '.', the field will be left blank.
-----
Country Name (2 letter code) [AU]:ET
State or Province Name (full name) [Some-State]:Shoa
Locality Name (eg, city) []:Addis Ababa
Organization Name (eg, company) [Internet Widgits Pty Ltd]:NotATether
Organizational Unit Name (eg, section) []:
Common Name (e.g. server FQDN or YOUR name) []:*.notatether.com
Email Address []:admin@notatether.com

Please enter the following 'extra' attributes
to be sent with your certificate request
A challenge password []:TypeASecretPasswordHere
An optional company name []:
Replace all of the contact fields with your own information. The Certificate Issuer will not use it to contact you, it is only for the purposes of creating the certificate. So do not type fake data in these fields.
Depending on what kind of certificate you ordered, you might be able to add a wildcard domain name such as *.notatether.com into the Common Name section. If you ordered a code signing certificate, this is where you would put the Publisher Name that appears next to signed applications. Also, you should create a random challenge password and store it somewhere safe.
Now open the domain.csr file in a text editor and copy the entire file contents. It should look something like this:
-----BEGIN CERTIFICATE REQUEST-----
MIIC8jCCAdoCAQAwgYcxCzAJBgNVBAYTAkVUMQ0wCwYDVQQIDARTaG9hMRQwEgYD
VQQHDAtBZGRpcyBBYmFiYTETMBEGA1UECgwKTm90QVRldGhlcjEZMBcGA1UEAwwQ
Ki5ub3RhdGV0aGVyLmNvbTEjMCEGCSqGSIb3DQEJARYUYWRtaW5Abm90YXRldGhl
ci5jb20wggEiMA0GCSqGSIb3DQEBAQUAA4IBDwAwggEKAoIBAQDFEjQxCRWTctSj
r64vneZntPvj5fr5FeZsKi7X+Bjgh4e7nwNynLcWpklw/Q3JDJuW38KbMPcLiPqb
uPbh9PrbQjmND51qAJyfE8CJ06pU+R57QFaOCi2kZkmY/OEHnhzIH0XV/UWVWbR+
TMrQUhbYulM5q54SNURjhGoDeKrONh10aNJMO7UjCaIZfG5JB571mxBaD+6LkAMU
15qb6OseRJNL0SosoFW9mKtUOg3h8nBT61uvvf9b4oVlni/NiBkgrllvjHdQER8n
sQE72CmOHa6hbRSIPQ+UrSIsJuPGzMLCT5ytReJhyKY0KHdQ7Q58MaNV5hDn7umC
VJ5YXE9hAgMBAAGgJTAjBgkqhkiG9w0BCQcxFgwUZURrMmN0cEtreDZITmdnNkIz
dkcwDQYJKoZIhvcNAQELBQADggEBAF3HeczCIksMEULsXipd6b4FjIyQUQRvMBrw
SUkpXj6dUvLAdvB0DS3MR0QMwa4mSzL8FF1ftumvW+2Z4HFQpXiChneWz5H23Pk1
ePnE9HKdSZJCuP4Jnjb3z4vLtuAKGORY7Eqq7ljbEIOee8K/jsNIw3L1nbz8EkQA
usksm5lJ5/mYJ2L8+onTH0iWmj/nE0CkW4DkSlmH9jrLYxFurh5gAbQ+AVYTM/5Q
Kw1wk7c1fZbmf+lmdU4QuSjgQdR0dEiR7f7SYFe5k0rc4b49Gu1lcgYK2MvzAjIv
1viH+5xHL3gyUslrdb1oOGS9N0QwFGoCgI1zGrnavCfsS/p5Mco=
-----END CERTIFICATE REQUEST-----
Paste this CSR into the website’s input form and go to the next step.
Add your contact information (again) and choose a verification method
Now the certificate issuer website will ask you to give it your first and last name, email and phone number. This is so they can contact you in case the information inside the CSR is not working or if they have problems verifying the CSR with your information.
An email will be sent to your mailbox with instructions on how to verify the certificate. Follow the instructions inside the email, then click on the Next button on the webpage.
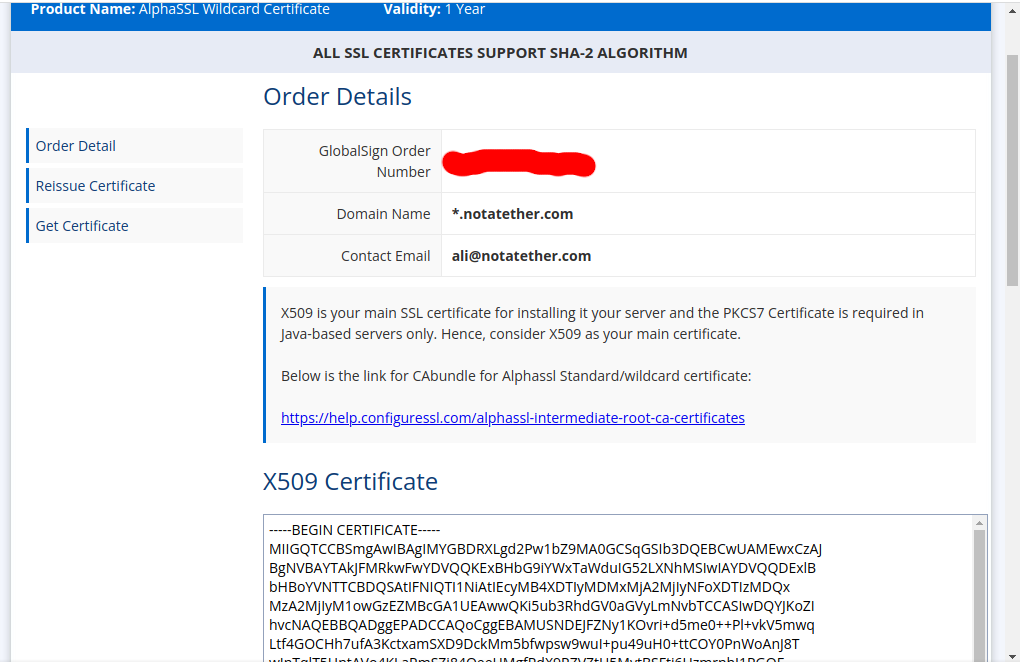
Depending on the certificate type, you might also have an alternative verification method where the website might gives you a TXT record which you must add to your website registrar’s DNS entries for verification purposes. Add this record to your site’s registrar. Personally, I used this method, since I wanted to buy a wildcard domain certificate.
The website will sign your certificate and give you back X509 and PKCS7 certificates for you to download or copy. You should use the X509 certificate in most cases, and the PKCS7 is only needed for old Java applications. Save the X509 and/or the PKCS7 certificates to files with the extension .crt. In any case, make sure you keep the private key file ending in .key.
Conclusion
Congratulations! You have successfully purchased a TLS certificate with crypto, using prepaid cards as an intermediary. Now you can use it in any application that needs secure network communication. If this article was useful to you, make sure you share it online.